A homeowner calls after a fingertip sinks into painted wood at the lower corner of a window. They want two answers before booking: “Can you patch it?” and “How much will it cost?” The office has seen neither the window nor the wall.
A limited sill repair may be possible when deterioration is confined to an accessible wood component and the surrounding assembly is sound. Softness under the frame, recurring wetness, loose joints, interior staining, or damage beyond the exposed sill calls for a wider evaluation. The visit should determine the affected parts and the water path before anyone chooses a filler, a replacement sill, or a new window.
The best intake record identifies the part, the extent the caller can observe, when it gets wet, what changed, and what access the technician will have. That gives the field team a useful starting point without turning reception into a remote estimator.
Start by naming the damaged part
Homeowners use “window sill” for several different pieces. Some mean the sloped exterior wood below the sash. Others mean the flat interior stool where plants sit. A caller may point to exterior casing, lower sash rails, trim, or a soft wall surface and use the same name.
Ask the caller to stand back and describe whether the damage is inside, outside, or visible on both sides. Then locate it by window and corner: the lower left corner of the dining-room window, the exterior sill below the right jamb, or the interior trim beneath the center window in a three-window group.
Request one wide photo that shows the whole opening and one close photo of the damaged area. A close-up by itself can hide the roof edge above, a nearby deck, the bottom of the siding, or the fact that three adjacent windows show the same staining. Ask the caller to label each image with the room, exterior wall, and date.
The National Park Service guide to repairing historic wooden windows starts with a condition assessment of the window's parts. That principle applies well beyond landmark buildings. Paint failure, open joints, surface weathering, softened wood, and missing material describe different conditions. The ticket should preserve those distinctions.
Separate a local repair candidate from a wider opening problem
Reception cannot test wood strength over the phone, but it can record the visible boundary. Ask where firm material appears to begin. Does the caller see one shallow patch of peeling paint, a soft corner, a crack across the sill, missing wood along the full width, or deterioration that continues up a jamb?
Then ask whether anything moves. A loose sill nose, shifting trim, a sash that no longer closes, or a frame that appears separated deserves a different note than weathered paint on a firm surface. Avoid telling the caller to press hard with a screwdriver or pry away trim. A technician can probe the material and open the assembly under controlled conditions.
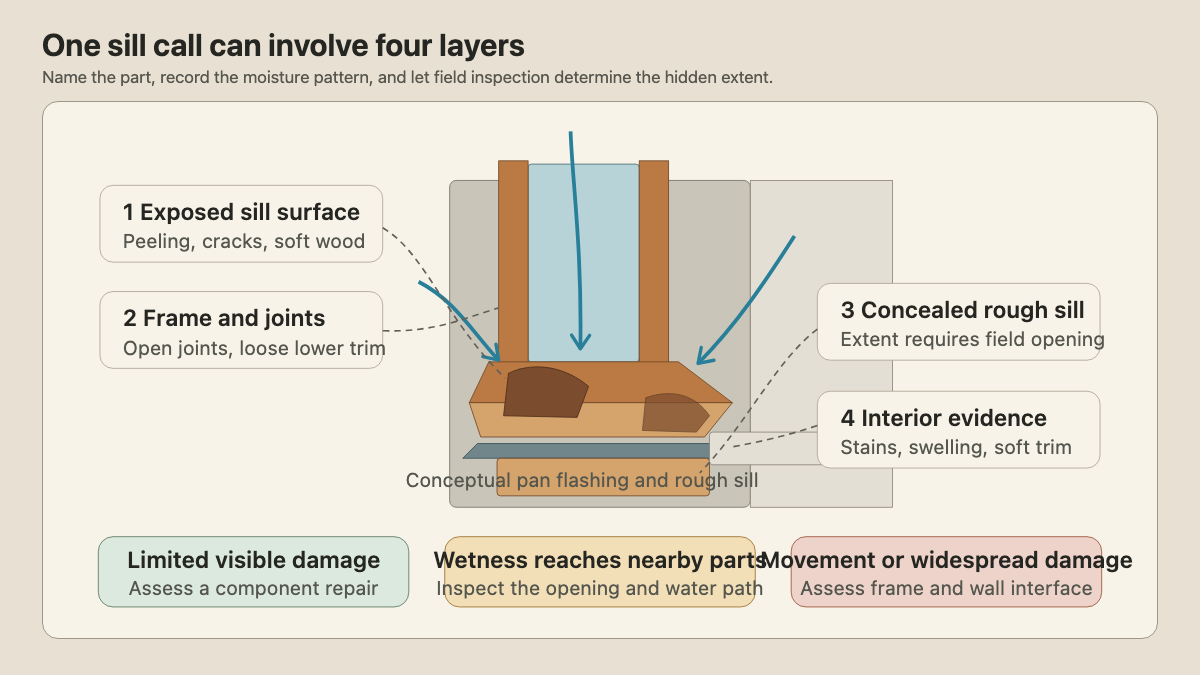
The U.S. Department of Energy-supported wood-window rehabilitation guideline treats the sill as a key water-shedding part of a traditional wood window. It also distinguishes the sill from the sash, frame, casing, trim, rough opening, and surrounding wall. Damage in one exposed piece may support a component repair. Damage crossing those boundaries can change the scope.
That is the main scheduling split. A small, accessible area with no reported movement or adjacent evidence may fit a repair evaluation. Recurring moisture, softness at frame joints, interior swelling, or broad deterioration needs an opening and water-management assessment. A replacement discussion can follow if the field findings support it. The full-frame versus insert consultation guide explains the next set of questions when the existing frame and wall interface enter the decision.
Capture how water reaches the sill
Rot requires a moisture history, but the visible damage does not reveal that history by itself. Ask when the area looks or feels wet. Useful answers sound like “after wind-driven rain from the east,” “every winter when the glass sweats,” or “the interior trim darkened after the gutter overflowed.” “It leaks sometimes” needs another question.
Record whether the caller sees condensation on the glass, water on the interior stool, staining below the window, peeling exterior paint, cracked sealant, an open joint, or wet siding above the opening. Ask about roof or gutter problems above that wall. Note sprinklers, planters, air-conditioning discharge, and a deck or porch that meets the wall nearby.
The Building Science guideline warns that interior evidence can come from several places. Leakage may occur through sash joints, between the frame and glass, around the rough opening, or at flashing above the window. Condensation can leave similar stains. A call taker should describe timing and location, then stop short of naming the cause.
Water management beneath the window matters too. DOE sill-flashing guidance describes pan or sill flashing that directs water away from the opening. University of Minnesota Extension places window flashing within the wall's drainage plane, where layers should move water outward and over the layer below. These are field conditions. A bead of caulk suggested during intake is not a substitute for finding the path.
Previous work belongs in the record. Ask when the window was installed, if known, and whether anyone has recaulked, repainted, wrapped, capped, reglazed, or repaired the sill. Request invoices, warranty documents, product labels, and before-and-after photos. “The handyman sealed it last spring, and the paint bubbled again after September rain” gives the evaluator a sequence.
Build a photo packet that answers field questions
A useful photo packet covers context, parts, and evidence. Ask for:
- an exterior view of the entire window and the wall above and below it;
- close views of the sill center, both lower corners, and any open joint;
- an interior view of the whole window, stool, apron, and wall below;
- close views of stains, swelling, peeling paint, gaps, or softened trim;
- the same area during or soon after the weather event, when safe; and
- product labels or prior repair records that identify the window.
Photos should never require a ladder, roof access, trim removal, or leaning outside. If the second-floor sill cannot be photographed safely, record that limitation. The field crew can plan access.
Ask whether shrubs, security screens, shutters, furniture, blinds, radiators, counters, sinks, or built-ins block the opening. Confirm the window height and story. Note lead-paint or historic-property concerns raised by the owner without making a regulatory determination. Older windows may also have preservation goals that change how the company approaches component replacement. The historic-home window consultation guide covers those records and priorities.
Book the visit without promising the repair
The appointment promise should stay narrow: the technician will inspect the visible window components, review accessible evidence around the opening, and explain what investigation or repair scope comes next. Do not promise that epoxy will hold, that only the sill needs work, or that a new window is unavoidable.
Before closing, read back the practical record. For example: “I have the exterior sill at the lower right corner of the west dining-room window. The wood feels soft across an area about the width of your hand, paint has peeled at the joint below the jamb, and the interior apron shows a stain after heavy rain. The window still opens. You will send one full exterior view, close views of both corners, an interior view, and the invoice from the 2022 installation.”
If water is actively entering, glass is loose, the opening will not secure, or material appears ready to fall, use the company's urgent-routing policy. Keep people away from unstable parts and avoid repair instructions. The separate window leak inspection intake guide handles active rain events in more detail.
A good rotted-sill call ends with a clearly identified window, photos from both sides, a weather and repair timeline, access notes, and an honest inspection scope. The homeowner gets a useful next step. The repair choice waits for the wood, flashing, frame, and wall to be seen together.